the feed
What is Shutter Speed and How to Use it Like a Boss
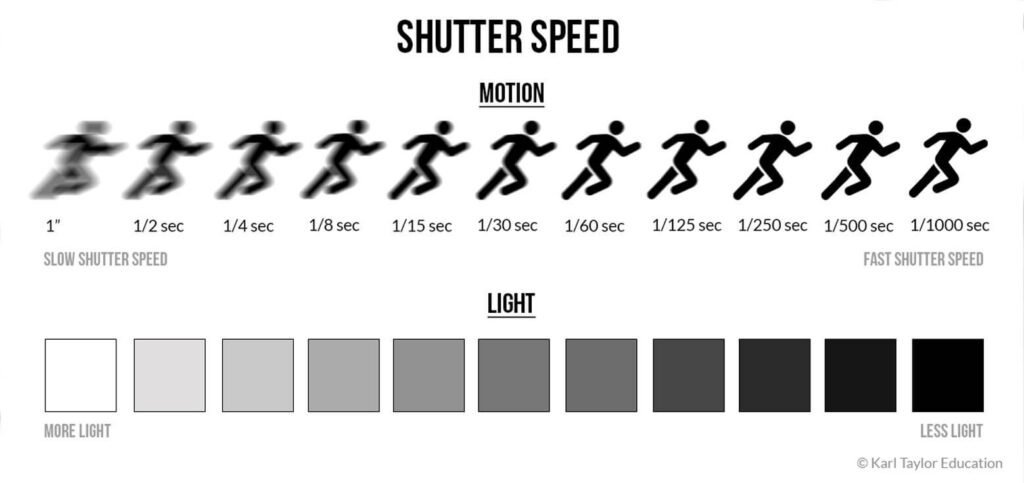
Shutter speed is mainly responsible for 2 things: changing the brightness of your photo and freezing action or blurring motion.
Let's talk about shutter speed, shall we?
You know that button you press to actually take a picture? It's called the Shutter Button, or shutter release. Want to know why? Because it controls the shutter, and what tf does that actually mean? Let's get into it.
First, let's talk about what and where the shutter is. Think of it like a curtain, a blackout curtain, that sits in front of the camera's sensor. In order for light to hit the sensor and produce photo magic, the shutter has to open. How long that "curtain" is open is called Shutter Speed. The longer it is open, the more light hits the sensor. We will talk about what this does to your final image in a bit.
How Does Shutter Speed Affect my Image?
Shutter speed is responsible for two particular things: changing the brightness of your photo and creating dramatic effects by either freezing action or blurring motion. When you use a long shutter speed (also known as a “slow” shutter speed), you end up exposing your sensor for a significant period of time.
A slow shutter speed will create motion blur when dealing with a moving subject. Think about car advertisements, where a sense of speed and motion is communicated to the viewer by intentionally blurring the moving wheels or how the background seems to be whizzing by. This is also how to create those beautiful "milky" moving water photos. Slow that shutter down.
Check out the 2 images below:
In the first image, the motion blur of the foreground and background gives you (the viewer) a sense of fast motion. This is using a slow shutter while moving the camera along with the rider.
In the second Image, the rider is frozen in action because a fast shutter was used.
Slow Shutter Speed = Motion Blur
Slow Shutter Speed = Motion Blur
Fast Shutter Speed = Frozen Action
Fast Shutter Speed = Frozen Action
Slowing down the shutter is also necessary to shoot in dim or dark environments such as photographing the Milky Way. Keeping the shutter open will allow the sensor to soak up as much light as possible. An example: throw your camera on a tripod, slap a 2 second timer on to minimize camera shake, and set the shutter to 30 seconds to create something like the photo below.
Milky Way Photographed using a slow shutter speed
Shutter Speed and Exposure
Shutter speed also affects the overall exposure of an image. A long shutter allows your camera sensor to gather a lot of light, and the resulting photo will be quite bright. A quick shutter speed means your camera sensor is only exposed to a small fraction of light, resulting in a darker photo.
Keep in mind that Shutter speed is only 1 of the 4 elements to consider when it comes to proper exposure. There is Aperture, ISO, and the brightness of what you are photographing. Unless you're in a studio, you can't do much to control the light of the environment, but you can control your camera settings. Photography is the art of understanding how to set these properly to achieve the image you want.
Take Me To Chapter 4: Let's Break Down What Aperture Is, ya?
Photography Basics Organization
(This will be filled in with links as I produce them) - Stay Tuned!!
Chapter 1:How Do I Use This F*cking Camera?!
Chapter 2:So What The F*ck is Photography Anyway??
Chapter 3:What is Shutter Speed and How to Use it Like a Boss (You are here)
Chapter 4: Let's Break Down What Aperture Is, ya?
Chapter 5: ISO
Chapter 6: Composition
Chapter 7: Metering
Chapter 8: Camera Modes
Chapter 9: Focusing
Chapter 10: Flash
Chapter 11: Camera Settings
Chapter 12: How to Take Sharp Pictures
Chapter 13: Photography Tips for Beginners
Chapter 14: Photography Ideas
So What The F*ck is Photography Anyway?
Photography is the art of capturing light with a camera. Snoozefest. It's art. It's creating and capturing. It is whatever you want it to be.
Let's go with the boring definition first: Photography is the art of capturing light with a camera, usually via a digital sensor or film, to create an image. Snoozefest. It's art, man. It's creating and capturing. It is whatever it is you want it to be. Biyatch, don't kill my vibe. That's what it is.
Photography can tell a story, it can capture a moment in time, it can document, and it can be art. There are many technical uses for photography as well as social and creative ones. How we capture and how we consume photos changes almost daily which keeps it fresh and exciting!
Do I need a Fancy Camera?
Let's start with this: the gear doesn't make the photographer. Do certain features found on pro or prosumer-level cameras help to enhance a photo? Yup. Is it necessary? Nope. Can you take a bomb-ass shot with your iPhone - Oh heck yes! Your eye is more important than the camera used.
I admit, I actually enjoy pissing people off when they ask me - what's the best camera? My reply? The one you have on you when you need it. It's just the truth. Most times that ends up being my iPhone, or my GoPro (anyone say Haboob?).
So what am I getting at? If you know what to look for when taking in a view, or composing a photo, the camera you use doesn't matter all that much - not until you are getting into professional usage for your photos. Then the resolution, depth of field, sharpness, etc come into play. We will get there - keep following along.
Basic Camera Gear
What are the Bare Necessities for Photography?
Now we are stepping away from your phones for this one and leveling up. We will start with the big 3 and then check out the optional accessories.
Camera. Pick one with interchangeable lenses so that you can try out different types of photography more easily. Read reviews, but don’t obsess over them. Trust me, you will spend way too much of your hard-earned money on photography gear over the years. At least do yourself a favor, and save yourself from the stress. Pick a reputable brand, look around on Facebook or OfferUp and jump in. You can always upgrade later.
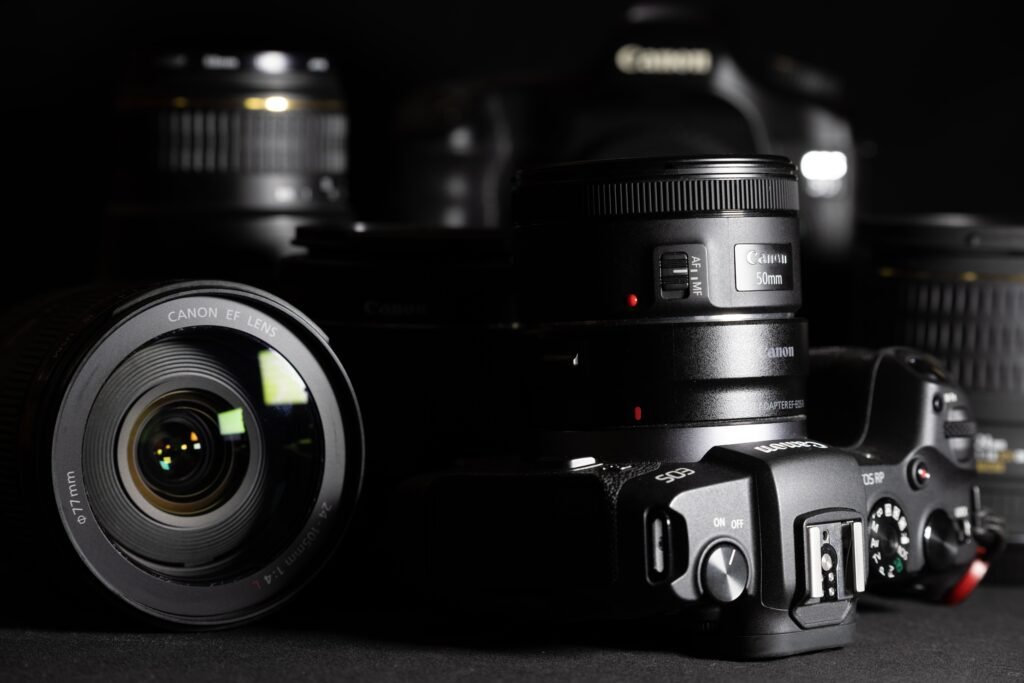
What do I use? My main camera body is the Canon EOS R5 and I absolutely love everything about it. It is incredibly feature-rich, has great ergonomics, super dependable, and checks all of my boxes as a professional shooter that needs to dabble in almost every type of photography out there. I use the Canon EOS R as my backup - the one I take backpacking because it is 1/2 the price and much lighter. For beginners, I would recommend maybe looking into the Canon EOS RP.
Lenses. For everyday photography, start with a standard zoom lens like a 24-70mm or 18-55mm. For portrait photography, pick a prime lens (one that doesn’t zoom) at 35mm, 50mm, or 85mm. For sports, go with a telephoto lens. For macro photography, get a dedicated macro lens. And so on. Lenses matter more than any other piece of equipment because they determine what photos you can take in the first place. If you want to start with one, I would recommend a 24-70mm to give you a great range to play with.
Post-Production Editing Software. It's my least favorite part, but it is part of the art. Adobe sells Lightroom and Photoshop as a bundle for $10/month, or you can buy standalone software from another company if you prefer; there are tons of options. Whatever you pick, stick with it for a while, and you’ll learn it quite well. This is where Youtube will be your best friend. Please, please, please don't start with Presets. Learn how to edit first, and then dabble with presets. Otherwise, you're robbing yourself of learning the basics and understanding what you are actually doing in the software.
Photography is the art of capturing light with a camera. Snoozefest. It's art. It's creating and capturing. It is whatever you want it to be.
Let's Call These Items Optional, Though We Know You're Going to Get it All!!
A tripod. A landscape photographer’s best friend.
Best Travel Tripod: Peak Design CF Travel Tripod
Best All Around Heavy Duty - Manfrotto MT055CXPRO4 055 Carbon Fiber 4-Section Tripod
Bags. Get a shoulder bag for street photography, a rolling bag for studio photography, a technical hiking backpack for landscape photography, and so on.
Best Backpack: Peak Design Everyday Backpack
Memory cards. Choose something in the 64-128 GB range to start. Get a fast card (measured in MB/second) if you shoot bursts of photos since your camera’s memory will clear faster.
Extra batteries. Get at least one spare battery to start, preferably two. I would NOT recommend off-brand batteries, even though they are usually way cheaper. In my experience, they don't last as long or maintain compatibility with future cameras and can actually damage your body.
Polarizing filter. This is a big one, especially for landscape photographers. Don’t get a cheap polarizer or it will harm your image quality.
My favorite: B + W Circular Polarizer Kaesemann - Xtra Slim Mount
Flash. Flashes can be expensive, and you might need to buy a separate transmitter and receiver if you want to use your flash off-camera. But for genres like portrait photography or macro photography, they’re indispensable.
My Favorite: GODOX AD200 Pro
Cleaning kit. The top item is a microfiber cloth to keep the front of your lens clean. Also, get a rocket blower to remove dust from your camera sensor more easily.
Other equipment. There are countless other photography accessories available, from remote shutter releases to GPS attachments, printers, and more. Don’t worry about these at first; you’ll realize over time if you need one.
What is Shutter Speed and How to Use it Like a Boss
Photography Basics Organization
(This will be filled in with links as I produce them) - Stay Tuned!!
Chapter 1:How Do I Use This F*cking Camera?
Chapter 2: So What The F*ck is Photography Anyway? (You are here)
Chapter 3: What is Shutter Speed and How to Use it Like a Boss
Chapter 4: Aperture
Chapter 5: ISO
Chapter 6: Composition
Chapter 7: Metering
Chapter 8: Camera Modes
Chapter 9: Focusing
Chapter 10: Flash
Chapter 11: Camera Settings
Chapter 12: How to Take Sharp Pictures
Chapter 13: Photography Tips for Beginners
Chapter 14: Photography Ideas
How Do I Use This F*cking Camera?
A step-by-step guide to using your camera like a boss. How can I take better photos? What settings should I use? And more Photography Basics!
Where to Begin
Treat this Photography Basics Series like a book. It is best to read it from start to end because each chapter builds on prior chapters. However, if you want to jump to something more specific, you’re welcome to skip ahead to a later chapter. Here is the overall organization of the guide:
Photography Basics by Chapter:
(This will be filled in with links as I produce them) - Stay Tuned!!
- Chapter 1: How Do I Use This F*cking Camera? (You are here)
- Chapter 2: So What The F*ck is Photography Anyway?
- Chapter 3: What is Shutter Speed and How to Use it Like a Boss
- Chapter 4: Aperture
- Chapter 5: ISO
- Chapter 6: Composition
- Chapter 7: Metering
- Chapter 8: Camera Modes
- Chapter 9: Focusing
- Chapter 10: Flash
- Chapter 11: Camera Settings
- Chapter 12: How to Take Sharp Pictures
- Chapter 13: Photography Tips for Beginners
- Chapter 14: Photography Ideas

Why I Wrote This
It's the set of questions I get asked all of the time. How can I take better photos? What settings should I have my camera on? Do I have to shoot in Manual Mode?
I have been a professional photographer for 15 years now. I have photographed in almost any imaginable scenario, climate, and circumstance forcing me to learn most of what I know on the fly. I admit, that most of my learning came through making mistakes. I hope this guide will allow others to learn from my mistakes and skip right past that painful part of the learning process.
Let me also say that I am writing in this in a fashion that makes the most sense to me. I’m going to give examples about how I personally understand camera settings, lighting, posing and all the good things that encompass photography. Most of my examples will focus on the type of work I do - adventure, lifestyle, product, editorial, etc. however all of the ideas and principles that I share can be applied to any type of photography.
Let me say this: Youtube University is an insanely great asset to use to learn all about photography. However, I would highly suggest having a rock-solid understanding of the basics before blindly following along. Once you have the basics dialed in, have at it on YT.
An Easy Guide To Cleaning Your Water Bottle
Quality water bottles are great for a variety of activities. An eco-friendly alternative to disposable plastic water bottles, they are durable and leakproof and should last you a long time as long as you care for them properly
Quality water bottles are great for a variety of activities. An eco-friendly alternative to disposable plastic water bottles, they are durable and leakproof and should last you a long time as long as you care for them properly. Washing them immediately after use and letting them dry is the best method, but that doesn’t always happen. I’ve outlined a few ways to clean your water bottle below to keep it fresh and ready to go!
Why Should You Clean You Water Bottle?
Like any household dishware, keeping your eating surfaces, utensils and plateware helps reduce bacteria buildup and funk. Plus, it's just downright gross not to wash your dishes, so get with it dude. I used to live with a guy who only rinsed his dishes with water after using them. That's gross - the rest of us had no idea, and we were using the same nasty dishes for years.
On a larger scale, having a dedicated water bottle to keep with you will help reduce single-use plastics such as disposable water bottles. It goes a long way. I have a few water bottles of different sizes and materials that serve their purpose for certain things such as airplane travel, hiking, running errands, etc. This mean I use them, wash them, and then they sit. This brings us to the next question:
How Often Should You Clean Your Water Bottle?
The "correct" answer that I should give here, and the one that won't get any backlash in the comment section, is that you should wash your water bottle after each use. If that's your jam, then have at it. I don't think it is necessary unless you are using powdered or sugary mixes in your water bottle. These will build up bacteria much more quickly then plain water, so they will need to be cleaned more often.
After each use, I rinse with hot water and let air dry upside down. I give it the sniff test before or after each use. This is my gauge and it works for me. Now, again, this is for when I am only using water in my water bottle and when I am the only one using it. Who shares water bottles anyway? #couplegoals. Gross.
The Baking Soda Shake:
Our preferred method. It's the quickest, cheapest, and most effective method. Say hello to your new best friend, Baking Soda. Give you water bottle a good rinse, maybe wash it down with dish soap if you would like, and then let's get to the good stuff. Drop 1/4 cup of baking soda in. Fill the Nalgene 3/4 full with HOT water. Close the Lid and shake your heart out. Really get that thing shook up, and make sure you get the underside of the cap as well. Rinse it out real good and dry.
This is the ultimate cleaning method to get all of the funk out of your water bottle. I used to be very hesitant to put any kind of powdered drink, such as Ultima or any other electrolyte, in my water bottles, even though I love having something other then water to sip on when I'm adventuring. I don't need to stress it anymore. Using baking soda gets all that and then some out of my bottle. Give it a try.
Oh, and check out this web story we made to break it down.
Now let's get to the more straightforward methods.
Dishwasher:
Putting your water bottle in the dishwasher is the easiest and least time-consuming way to clean it. The majority of them can be washed in the dishwasher, but verify the manufacturer's instructions first. Because the lid may not tolerate the heat as well as the bottle itself, it should be placed on the upper rack away from the heating element. If your dishwasher's higher rack won't fit the size of your water bottle, don't worry; there are other cleaning solutions.
Soak in Warm, Soapy Water:
Allow the water bottle to soak in a sink with warm water and a little bit of mild dish soap. Shake it to disperse the soapy water, then rinse thoroughly and dry it.
There should be no soapy flavor left in the bottle if you use a tiny amount of mild soap. If you don't want to use soap, you can clean the bottle with warm water and lemon or warm water and baking soda.
This is especially useful if your bottle is solely used for water and other non-staining drinks. If you are like me and sometimes toss in some Ultima or other electrolyte drink mix, you will need to get a bit more aggressive in your cleaning. (hello, baking soda; see above)
Denture Cleaning Tablets
You can buy water bottle cleaning tablets or a new technology disinfectant glass cleaner if you want a professional cleaning product to ensure that your bottle is properly disinfected. Simply dissolve the cleaning tablets in water and allow them to dissolve in the bottle overnight. Give it a good shake before rinsing it thoroughly.
Shoppers tip: Water bottle cleaning tablets can be replaced with denture cleaning tablets at a lower cost. We use Polident Overnight Whitening Antibacterial Denture Cleanser Effervescent Tablets (man, that's a mouth full - see what I did there?). This works, but does leave a minty flavoring to your bottle unless you wash again after rinsing. Make sure you choose a brand-name denture-cleaning tablet with increased cleaning power to ensure it actually does what it says it's going to do.


OUTDOOR
ADVENTURE
Featured Posts
HIKING
|
FLY FISHING
|
CAMPING
|
BACKPACKING
|
GEAR REVIEWS
|
HIKING | FLY FISHING | CAMPING | BACKPACKING | GEAR REVIEWS |
Best of
Top Clothing Brands of 2023
Discover unbeatable deals on Patagonia winter essentials at the REI Outlet sale! Get up to 40% off on jackets, parkas, and more.
Subscribe to Our Newsletter
Sign up with your email address to receive news and updates.
Get in touch.
Just like in a hardcore round of intense pickleball, communication is key! Reach out with any questions, comments, beer recommendations, inquiries, critiques and jokes.






The best Black Friday deals for Ford Bronco owners. From racks and rooftop tents to storage, recovery gear, and camping upgrades—this is my full 2025 build list & wish list.